Navigate This Post
Don’t screw it up. That was what I was thinking the first time I did a DuraCoat refinishing project on a gun. Did I screw it up? Well, not entirely. However, there was definitely room for improvement. Keep in mind, I am not a professional painter or refinisher, I’m just a guy in my garage.
It has been about ten years since I attempted to DuraCoat a firearm myself, rather than shipping it off to the professionals in Wisconsin to complete. Over the last decade I have learned many lessons from my mistakes and I would like to share them with you.
![Welcome to the Haus of Pain & Do It Yourself DuraCoat [S5E09]](https://studentofthegun.com/wp-content/uploads/2019/01/Welcome-to-the-Haus-of-Pain-Do-It-Yourself-DuraCoat-S5E09-534x300.png)
With practice, great things can be done with DuraCoat
Lesson 1: Don’t Shortcut the Prep
By “prep” I mean the preparation that goes into a refinishing job. The first step is to disassemble the firearm down as far as you feel that you can put it back together. As a matter of fact, you might want to disassemble the gun and put it back together once or twice before you DuraCoat it. Naturally, some firearms will be more intuitive than others when it comes to taking them apart. Thank goodness for Youtube in our modern age.
When the gun is apart, take the TruStrip, that you were smart enough to purchase from DuraCoat, and a blue or green 3M scratch pad and “spray and scrub”. Be absolutely meticulous in this regard. If you have a gun that has some age to it, there will be years of Hoppes #9, RemOil, or whichever CLP you favor. Get that off of any surface you are going to DuraCoat.
Professionals with dedicated shops will have sandblasting boxes and dunk tanks to use. For the average guy in a garage or workshop, you can get away with TruStrip and a product that DuraCoat cans “No Sand”. The No Sand Prep Solution helps you to “rough up” the external surface where the DuraCoat will be applied. Remember, the prep process must be applied to anywhere you plan to coat, regardless of whether it is steel, aluminum, or some kind of polymer. Bottom line, the key to a great finish is a good start.
If you are planning to DuraCoat polymer, particularly a shiny or glossy polymer, be sure that you focus on that with the No Sand Prep. Also, I would recommend that you purchase a can of Adhesion Promoter. Some plastic is inherently slick and hard to coat. (NOTE: Magpul polymer accessories and Glock frames are fantastic material and accept DuraCoat very well.)

Access to the Steve Lauer Interview
Plus the 7 Training Tips That Could Save Your Life Online Course!
Lesson 2: Plan It Out
Before you spray one single ounce of DuraCoat, take the time to plan out in your head how you want the project to look. If you are doing a single color for the entire gun, this is a simple process you just need to tape over anywhere that you don’t want DuraCoat. (*NOTE: for firearms, you want to keep coating out of the barrel/chamber, off of action rails and bars, and off of any small moving parts.)
For a multi-color or camouflaged pattern, you will need to consider your initial template placement and which colors you want the most of on your project. Remember, when using templates, as opposed to spray-through stencils, you have the reverse effect.
Also, when you are planning, give yourself time. When doing a multi-color finish, you must allot time for each color to dry before applying the next one. Professional shops have industrial drying ovens, you have wire hangers and air. DuraCoat does not require heated baking, only air drying. Depending on the humidity and temperature in your area this time will vary. When I am doing a multi-color project, I plan to leave each color coat overnight and pick up the next morning.
Lesson 3: Patience
When it comes time to apply the DuraCoat color, the keep word is “patience”. Begin with the spray nozzle off project and quickly spray side to side or top to bottom, keeping the nozzle 3-4 inches off of the surface. If the DuraCoat is beading or dripping, you are either too close to the surface or you are not moving the nozzle quickly enough.
Apply the DuraCoat in light coatings with quick passes. Take a moment to look at your project and judge whether or not you are coating it evenly. Remember, your gun is not an M&M, you don’t need to put a thick candy shell over it.
If you did mess it up and not a drip or bead of coating, all is not lost. Go grab your can of TruStrip, spray it on, wipe it off, let it dry and start again. Trust me, it is better to strip off the mistake and start again than to leave the mistake on the project. No, a thick drip or bead will not just “flatten out when it dries”. Yes, I was that guy and made that mistake.
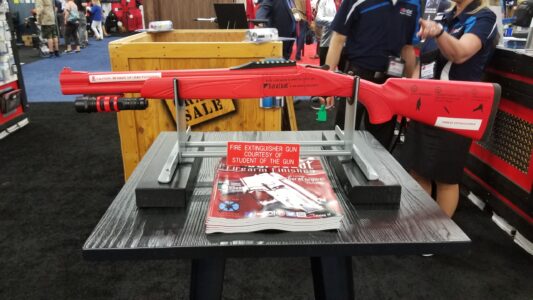
Our proudest DuraCoating achievement: The Fire Extinguisher Gun
Lesson 4: Start Simple
My advice for you first DuraCoat job would be to start simple and do a single color on a gun that is not necessarily your favorite or the most expensive one in the safe. If you are completely unsure of your skills, DuraCoat a very simple gun, such as a single barreled shotgun or even a steel ammo can. Give yourself the opportunity to make mistakes without the worry that you will be ruining your favorite gun.
Although it should go without saying, I will say it anyway. Take the time to read the instructions that DuraCoat provides with all of their products. If you screw it up because you were too smart to read directions, that is your fault. Seriously, read the directions.
Parting Thoughts
Just like sex, you are not going to be perfect the first time you do it. However, if you are diligent, you will get better each time. Eventually, if you follow the simple advice I have offered, your gun refinishing jobs will bring you pride and be the envy of the dudes at your range.
Heck, maybe you will enjoy the process so much that you want to enroll in DuraCoat University and learn how to do it like a professional. If you are a gunsmith or have an FFL, DuraCoat Refinishing is a great product to offer your customers as well as a way to put some Republic Credits into your account.
Wanna REALLY learn how to DuraCoat? You can join DuraCoat University! Tell them SOTG sent you.
Professor Paul Markel
Latest posts by Professor Paul Markel (see all)
- SNW Presents Guns of the Cold War | Press Release - December 1st, 2025
- Hope I Die Before I Get Old: Strength Training is About More than Looks - July 28th, 2025
- The Monk and the Mountain - April 29th, 2025
- The Parable of the Rats - August 14th, 2024
- Tactical Masturbation: Top 3 Stupid Human Tricks - July 8th, 2024
My first experience with this product… I ordered a nice deep dark gray blue battleship gray. But when I got was white sky blue with a splash of gray. Not impressed. At all. But fortunately… When I showed them what happened they made another mistake. I asked for a can of HK Blue / Gray and somebody else reached out to me and I thought it was the same person and they recommended Blue steel and I said that would be fine. And I ended up getting a 12 oz aerosol can of both.
The advice you give is amazing in this article however.. at a current cost of $76.58 per can delivered… I couldn’t spray anything other than my firearms. Three coats on a Mossberg 500 just the receiver the shell tube and the barrel used up the entire can.
I just finished painting my Beretta two-tone HK blue / gray and blue steel. And I’m going to be painting Blue steel camouflage stripes onto that light blue gray Mossberg that I just mentioned is what is left.
It is an amazing product I love that it dries to the touch very quickly. And I’m something of a geek when it comes to science. So I read all about the molecular structure of the chemicals that are in this product and how they function. It’s amazing that it gets so hard yet it remains somewhat elastic.. That’s why it resists chipping and scratches so well.
I have 11 more firearms that I plan on refinishing. And I will be using duracoat on all of them.
And evidently after you make your first purchase if you create an account with them on the website.. you get 20% off literally everything that they sell moving forward. 20% off… That means instead of being 60 something dollars before shipping per can now it’s $48 per can. Good stuff. Thank you for your article I do appreciate it.